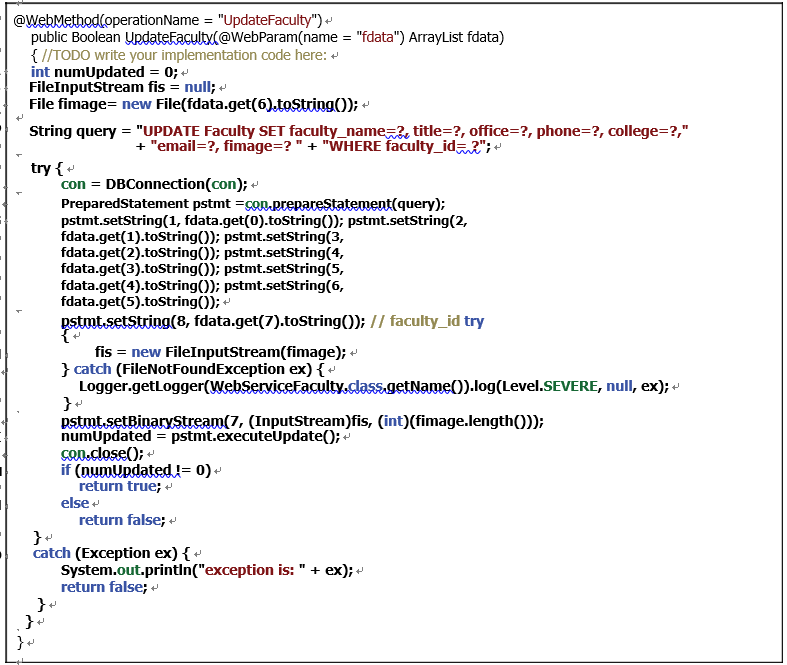
Let’s have a closer look at this piece of code to see how it works.
A. A local integer variable, numUpdated, is created first, and this variable is used to hold the run result of execution of the data update operation.
B. An instance of the FileInputStream class, fis, is generated and it is used to convert the updated faculty image to a FileInputStream format, and the converted image file can be updated to the database later.
C. A new File instance, fimage, is also declared and initialized with the path or location of the updated faculty image, which is located at the sixth position with an index of 6 on the input ArrayList that contains all eight pieces of updated faculty information. A point to be noted is that the variable in the seventh position (7) in the input ArrayList is the faculty _ id parameter.
D. The update query string is created with eight positional parameters. The query criterion is the faculty _ id that is the eighth positional parameter and placed after the WHERE clause.
E. A try-catch block is used to perform this data update action. First a user-defined method, DBConnection(), is called to set up a connection between our Web service and our sample database. A connection instance, con, is returned after the execution of this method.
F. A new PreparedStatement instance, pstmt, is created to perform this update query.
G. Seven setString() methods are used to set up the actual values for the seven positional dynamic updated parameters in the update query statement. One point to be noted is that the order of these setString() methods is not continuous from 1 to 8 because the sev-enth positional parameter is the updated faculty image, which will be processed separately, and the eighth positional parameter is the faculty _ id.
H. Another try-catch block is used to convert the updated faculty image to the FileInputStream format and make it ready to be written into the database.
I. The catch block is used to check any possible exception for this conversion. The excep-tion information will be recorded into a system log file if it occurs.
J. The converted faculty image is written into the seventh positional dynamic parameter via a setBinaryStream() system method.
K. The update action is performed by calling the executeUpdate() method, and the update result is returned and stored in the local integer variable numUpdated.
L. The database connection is closed by executing the close() method since we have com-pleted our data update action and need to disconnect our database.
M. The executeUpdate() method will return an integer to indicate whether this data update is successful or not. If a non-zero value is returned, which means that at least one row has been updated in our Faculty Table and this data update action is successful, a true is returned to the client project.
N. Otherwise, if a zero is returned, it means that no row has been updated in our sample data-base and this data update fails. A false is returned for this situation.
O. The catch block is used to track and display any exception during this data update pro-cess, and a false will be returned if one occurs.
Before we can build a Window-Based or Web-Based project to consume this Web Service proj-ect to test the data update function, let’s take care of the code for the data delete action against our sample database using the Web service operation DeleteFaculty().