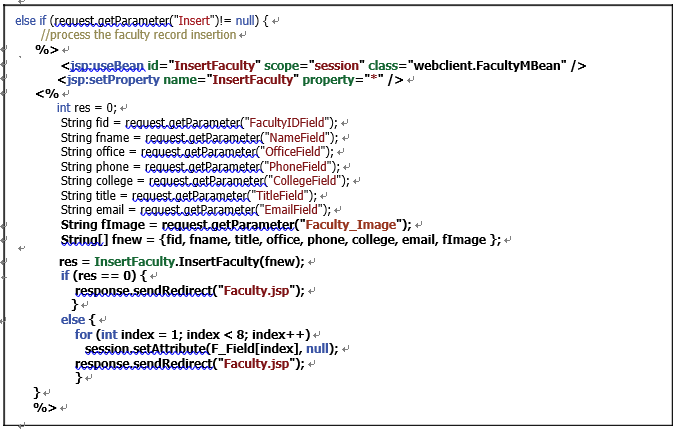
The code related to steps 1~5 is shown in steps 1~4 in Figure 9.50. Add the Java code shown in steps A~E in Figure 9.50 into this block.
Let’s have a closer look at this code to see how it works.
A. An additional system method, getParameter(), is used to get the name of the selected faculty image, which is located at the Faculty _ Image tag in the view class Faculty. jsp. The name of the selected faculty image will be automatically assigned and stored to the Faculty _ Image tag in the view class as soon as the image is selected.
B. A new String array, fnew, is created, and it is used to hold eight pieces of new faculty information stored in the eight local String variables.
C. The InsertFaculty() method defined in our Java Bean is executed to insert these eight pieces of faculty information as a new faculty record into the Faculty Table. The eight pieces of new faculty information are stored in the String array fnew that works as the argument for this method. The run result of this method is returned and assigned to the local integer variable res.
D. If the run result is 0, it means that no record has been inserted into the Faculty Table, and this data insertion fails. In that case, we need to re-display the Faculty.jsp page to enable users to re-insert the faculty record.
E. If the run result is non-zero, it means that the new faculty record has been inserted into the Faculty Table. We need to clean up all seven fields that contain seven pieces of new inserted faculty information in the Faculty.jsp page to enable users to either test this insertion or insert another faculty record. A for() loop is used for that purpose.
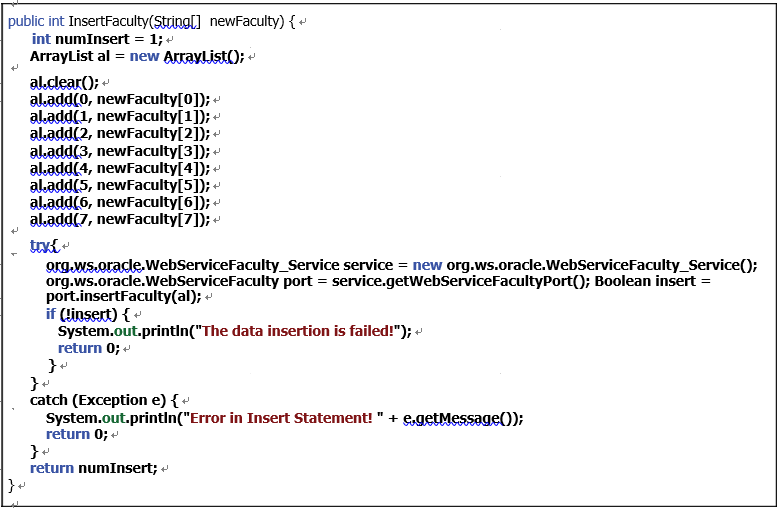
Now let’s do our code for the Java managed bean class FacultyMBean.java.
Open our Web-based client project, WebClientFaculty _ Insert, and double-click on the FacultyMBean.java in the Projects window to open the managed bean class file. Let’s develop the code for the Insert() method in this class to fulfill this data insertion function.
Browse to the Insert() method and enter the code, as shown in Figure 9.51, into this method.
Let’s have a closer look at this code to see how it works.
A. Some local variables, such as an integer variable numInsert and an ArrayList instance al, are created. The first variable is used to hold the run result of this data insertion, and the second variable is used to pick up and reserve the input new faculty data array.
B. The clear() method is executed to make sure that the ArrayList instance is clean before a new faculty record is collected.
C. The add() method is used to pick up and add eight pieces of new faculty information into this new ArrayList instance al. Eight pieces of new faculty information are entered and selected by the user in the JSP page Faculty.jsp and stored in eight tags defined in the view class Faculty.jsp page.
D. A try-catch block is used to call the data insertion operation InsertFaculty() defined in our Web Service project. First a service instance with its service port is generated.
E. The InsertFaculty() operation in our Web service is called with the ArrayList instance that contains eight pieces of new faculty information as the argument. The exe-cution result of this faculty data insertion is returned and assigned to the local Boolean variable insert.
F. If the returned Boolean variable insert is false, which means that this data insertion fails, a system method, System.out.println(), is used to indicate this.
G. The catch block is used to catch any possible exception during the data insertion process.
H. Finally the run result of this data insertion is returned to the calling method.
Now let’s build and run our Web client project to call our Web service operation to perform the faculty data insert action.