9.10.2 Develop the Code to Call Our Web Service Project
To call our Web Service project to insert a new faculty record into the Faculty Table in our sample database, we need to perform the following code modification and development:
1) Modify the view class Faculty.jsp file to add a File Selection function to enable users to select a new faculty image to be inserted into the database.
2) Modify the control class FacultyProcess.jsp page to direct the insert query to the related operational method defined in the Java Bean class FacultyMBean. java file.
3) Create and add code into the model class FacultyMBean.java to call the related opera-tion, InsertFaculty(), defined in our Web Service to perform data insertion actions.
Let’s handle these tasks one by one in the following section. First let’s modify the view class Faculty.jsp by adding a File Selection function. Refer to Section 8.5.1 in Chapter 8 to perform this modification. For your convenience, we highlight the related modifications for that page in this part again. Perform the following steps to add this function:
1) Open the Faculty.jsp page and scroll down this file to find one of the input tags, which should be around line 381:
2) Enter the following tag and locate it just above the tag shown previously.
Your modified Faculty.jsp page should match the one shown in Figure 9.49. The new added tag part is in bold.
Next let’s modify the controller class FacultyProcess.jsp file to direct the insert query to the related method defined in that class.
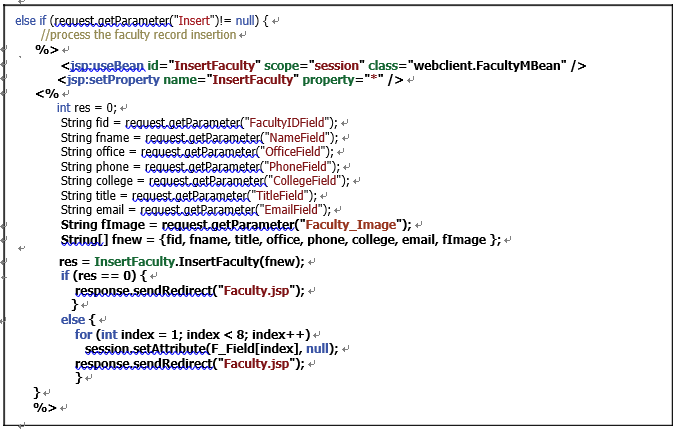
Open the controller class file, FacultyProcess.jsp, and perform the following modifica-tions, as shown in Figure 9.50, to that file.

FIGURE 9.49 The modified code for the Faculty.jsp page.

FIGURE 9.50 The modified and added code for the Insert block in FacultyProcess.jsp.
1) Move cursor to the else if (request.getParameter(“Insert”)!= null) block, then type a JSP ending tag, %> under the else if statement, and click on the Enter key from the keyboard to get a new line under the else if block. Keep the cur-sor in that new line location.
2) Open the Palette window by going to Window > IDE Tools > Palette item. In the opened Palette window, browse to the JSP tab, expand it and drag the Use Bean icon and place it under the JSP ending tag %>.
3) In the opened Insert Use Bean dialog, enter InsertFaculty into the ID field and webclient.FacultyMBean into the Class field. Select session from the Scope combo box. Click on the OK button to close this dialog box.
4) Add a JSP directive just under the previous JSP directive to set up all properties on the Java bean class FacultyMBean.java:
5) Add an opening JSP directive <% to start our Java code to be built in the following.