Develop the Code to Call Our Web Service Project – Develop Java Web Services to Access Databases

9.10.2  Develop the Code to Call Our Web Service Project

To call our Web Service project to insert a new faculty record into the Faculty Table in our sample database, we need to perform the following code modification and development:

1) Modify the view class Faculty.jsp file to add a File Selection function to enable users to select a new faculty image to be inserted into the database.

2) Modify the control class FacultyProcess.jsp page to direct the insert query to the related operational method defined in the Java Bean class FacultyMBean. java file.

3) Create and add code into the model class FacultyMBean.java to call the related opera-tion, InsertFaculty(), defined in our Web Service to perform data insertion actions.

Let’s handle these tasks one by one in the following section. First let’s modify the view class Faculty.jsp by adding a File Selection function. Refer to Section 8.5.1 in Chapter 8 to perform this modification. For your convenience, we highlight the related modifications for that page in this part again. Perform the following steps to add this function:

1) Open the Faculty.jsp page and scroll down this file to find one of the input tags, which should be around line 381:
2) Enter the following tag and locate it just above the tag shown previously.

Your modified Faculty.jsp page should match the one shown in Figure 9.49. The new added tag part is in bold.

Next let’s modify the controller class FacultyProcess.jsp file to direct the insert query to the related method defined in that class.

Open the controller class file, FacultyProcess.jsp, and perform the following modifica-tions, as shown in Figure 9.50, to that file.

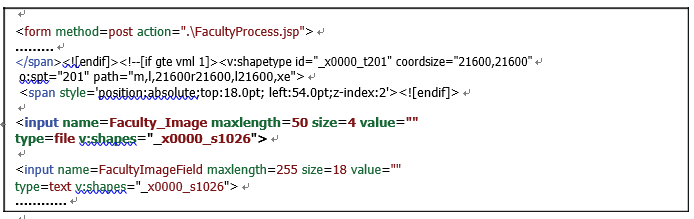
FIGURE 9.49   The modified code for the Faculty.jsp page.

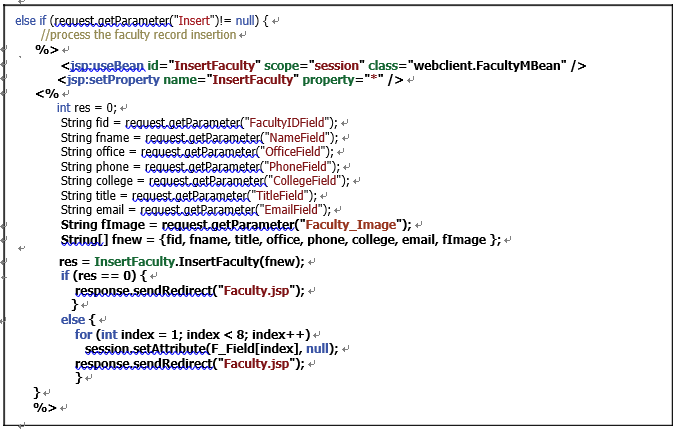
FIGURE 9.50  The modified and added code for the Insert block in FacultyProcess.jsp.

1) Move cursor to the else if (request.getParameter(“Insert”)!= null) block, then type a JSP ending tag, %> under the else if statement, and click on the Enter key from the keyboard to get a new line under the else if block. Keep the cur-sor in that new line location.

2) Open the Palette window by going to Window > IDE Tools > Palette item. In the opened Palette window, browse to the JSP tab, expand it and drag the Use Bean icon and place it under the JSP ending tag %>.

3) In the opened Insert Use Bean dialog, enter InsertFaculty into the ID field and webclient.FacultyMBean into the Class field. Select session from the Scope combo box. Click on the OK button to close this dialog box.

4) Add a JSP directive just under the previous JSP directive to set up all properties on the Java bean class FacultyMBean.java:

5) Add an opening JSP directive <% to start our Java code to be built in the following.

Build and Run Our Client Project to Insert Faculty Data via Web Service – Develop Java Web Services to Access Databases

9.10.3   Build and Run Our Client Project to Insert Faculty Data via Web Service

Prior to building and running this Web application, make sure that the new faculty image to be inserted into our database has been stored in your local folder, such as C:\Faculty Images. All faculty images can be found in the folder Images\Faculty in the Students folder on the CRC Press ftp site. One can copy and paste them to your local folder. Also make sure that our Web Service application project, WebAppFaculty, has been built and deployed.

Now click on the Clean and Build Main Project button to build our client project. If everything is fine, click on the Run Project button (green arrow) to run our client project.

On the opened view class Faculty.jsp page, enter the following data as a new faculty record into the seven related TextFields and select the desired faculty image.

Faculty ID:D58996
Name:Charley David
Title:Professor
Office:MTC-114
Phone:750–378–1500
College:University of Miami
Email:[email protected]
FimageDavid.jpg

Then click on the Browse button in the File Selection box (right on the Image label) to select a desired faculty image, David.jpg, from your local image folder. The finished new faculty record is shown in Figure 9.52.

Click on the Insert button to try to call our Web service operation, InsertFaculty(), to insert this new faculty record into the Faculty Table in our sample database.

FIGURE 9.52   Seven pieces of new inserted faculty information.

FIGURE 9.53   The confirmation of a new faculty record insertion.

To confirm this data insert, two methods can be used. The first way is to perform another query for the selected faculty Charley David by typing this name into the Faculty Name box and clicking on the Select button. Now you can find that seven pieces of new inserted faculty infor-mation have been retrieved and displayed in this page with the selected faculty image, as shown in

Figure 9.53. Click on the Back button to terminate our project.

FIGURE 9.54   The new inserted faculty record.

The second way to confirm this data insertion is to open our Faculty Table using the Services window in the NetBeans IDE to check whether this new faculty record has been inserted. To do that using the Services window in the NetBeans IDE 12.0:

1) Open the Services window and expand the Databases node.
2) Right-click on our sample Oracle database URL: jdbc:oracle:thin:@local host:1521:XE;, and select the Connect item to connect to our database. You may need to enter a valid password, oracle _ 18c, to complete the database connection action.

3) Expand our sample database, CSE _ DEPT, and Tables.
4) Right-click on the Faculty Table and select the View Data item.

Your opened Faculty Table is shown in Figure 9.54.
It can be seen that the new faculty record, Charley David, with the faculty _ id of D58996, which is located at the ninth row, has been successfully inserted into our database.

Our Web client project to consume our Web service WebServiceFaculty is successful! A complete Web client project, WebClientFaculty _ Insert, can be found in the folder Class DB Projects\Chapter 9 that is located in the Students folder at the CRC Press ftp site (refer to Figure 1.2 in Chapter 1).

Next let’s discuss how to build a Web service to perform data updating and deletion against our sample Oracle database.

BUILD JAVA WEB SERVICE TO UPDATE AND DELETE DATA FROM THE ORACLE DATABASE – Develop Java Web Services to Access Databases

9.11  BUILD JAVA WEB SERVICE TO UPDATE AND DELETE DATA FROM THE ORACLE DATABASE

It is straightforward to perform data update and delete actions against our sample Oracle data-base via Web service, and we can add two more new operations, UpdateFaculty() and DeleteFaculty(), into our Web service project WebServiceFaculty we built in the previous sections. First let’s concentrate on the faculty data update action.

One key point to be noted when performing a data update action is that in most real applications, a completed faculty record should be updated, except the faculty _ id, since it is much easier to insert a new faculty record with a new faculty _ id than to update a record with an updated faculty _ id because of the complexity in cascaded update relationships we built in Chapter 2 when we created our sample database. Therefore, in this section, we will concentrate on the updat-ing a faculty record based on an existing faculty _ id.

9.11.1  Add a New Operation UpdateFaculty() to Perform Faculty Data Update

Perform the following operations to add a new operation, UpdateFaculty(), into our Web ser-vice project, WebServiceFaculty:
1) Launch NetBeans IDE 12.0 and open our Web application project, WebAppFaculty, and our Web service main class file, WebServiceFaculty.java, in the Projects window.

2) Click on the Design button at the top of the window to open the Design View of our Web service class file, WebServiceFaculty.java.
3) Click on the Add Operation button to open the Add Operation wizard.
4) Enter UpdateFaculty into the Name field and click on the Browse button next to the Return Type combo box. Type boolean into the Type Name field and select the item Boolean (java.lang) from the list, and click on the OK button.

5) Click on the Add button and enter fdata into the Name parameter field. Then click on the dropdown arrow of the Type combo box, and select the Choose item to open the Find Type wizard. Type Arraylist into the top field and select the ArrayList (java. util) data type, and click on the OK button to select an ArrayList as the data type for the input parameter.

Your finished Add Operation wizard should match the one shown in Figure 9.55. Click on the OK button to complete the new operation creation process.

Click on the Source button on the top of this window to open the code window of our Web service project. Let’s develop the code for this new added operation.
In the opened code window, enter the code shown in Figure 9.56 into the new operation.

FIGURE 9.55   The complete Add Operation wizard.

FIGURE 9.56   The code for the new operation, UpdateFaculty().

Add a New Operation DeleteFaculty() to Perform Faculty Data Delete – Develop Java Web Services to Access Databases

9.11.2  Add a New Operation DeleteFaculty() to Perform Faculty Data Delete

Perform the following operations to add a new operation, DeleteFaculty(), into our Web ser-vice project, WebServiceFaculty:
1) Launch NetBeans IDE 12.0 and open our Web application project, WebAppFaculty, and our Web service main class file, WebServiceFaculty.java, in the Projects window.

2) Click on the Design button at the top of the window to open the Design View of our Web service class file WebServiceFaculty.java.
3) Click on the Add Operation button to open the Add Operation wizard.
4) Enter DeleteFaculty into the Name field and click on the Browse button that is next to the Return Type combo box. Type boolean into the Type Name field and select the item Boolean (java.lang) from the list, and click on the OK button.

5) Click on the Add button and enter fname into the Name parameter field to add a new parameter for this operation. Keep the default data type java.lang.String unchanged for this new added parameter fname.

Your finished Add Operation wizard should match the one shown in Figure 9.57. Click on the OK button to complete the new operation creation process.

Click on the Source button at the top of this window to open the code window of our Web ser-vice project. Let’s build the code for this new added operation.
In the opened code window, enter the code shown in Figure 9.58 into the new operation.

FIGURE 9.57  The complete Add Operation wizard.

FIGURE 9.58  The code for the new operation, DeleteFaculty().

Let’s have a closer look at this piece of code to see how it works.

A. A local integer variable, numDeleted, is created first, and this variable is used to hold the run result of execution of the data delete operation.
B. The delete query string is created with one positional parameter, which is the original fac-ulty name that works as the query criterion and is placed after the WHERE clause.
C. A try-catch block is used for this data delete action. First the user-defined method DBConnection() is called to set up a connection between our Web service and our sam-ple database. A connection instance, con, is returned after the execution of this method.

D. A new PreparedStatement instance, pstmt, is created to perform this delete query.
E. The setString() method is used to set up the actual value for the positional dynamic parameter in the delete query statement.

F. The delete action is performed by calling the executeUpdate() method, and the delete result is returned and stored in the local integer variable numDeleted.
G. The database connection is closed by executing the close() method since we have com-pleted our data delete action and need to disconnect any connection between our project and our database.

H. The executeUpdate() method will return an integer to indicate whether this data delete action is successful. If a non-zero value is returned, which means that at least one row has been deleted from our Faculty Table and this data delete action is successful, a true is returned to the client project.

I. Otherwise, if a zero is returned, it means that no row has been deleted from our sample database, and the data delete fails. A false is returned for this situation.
J. The catch block is used to track and display any exception during the data delete process, and a false will be returned if one occurs.

At this point, we have completed all code development for the data update and delete actions.

Now let’s build and run our Web service project to test these functions.