GETTING STARTED WITH JAVA WEB SERVICES USING NETBEANS IDE – Develop Java Web Services to Access Databases

9.4  GETTING STARTED WITH JAVA WEB SERVICES USING NETBEANS IDE

In the following sections, we will develop and build different Java Web services projects based on our Oracle Database XE 18c database system with different consuming projects to perform desired database operations.

By adding different operations or methods to our Web service projects to access and manipulate data in Tables, such as the Faculty and Course Tables, in our sample Oracle database, we can perform the following data queries and manipulations:

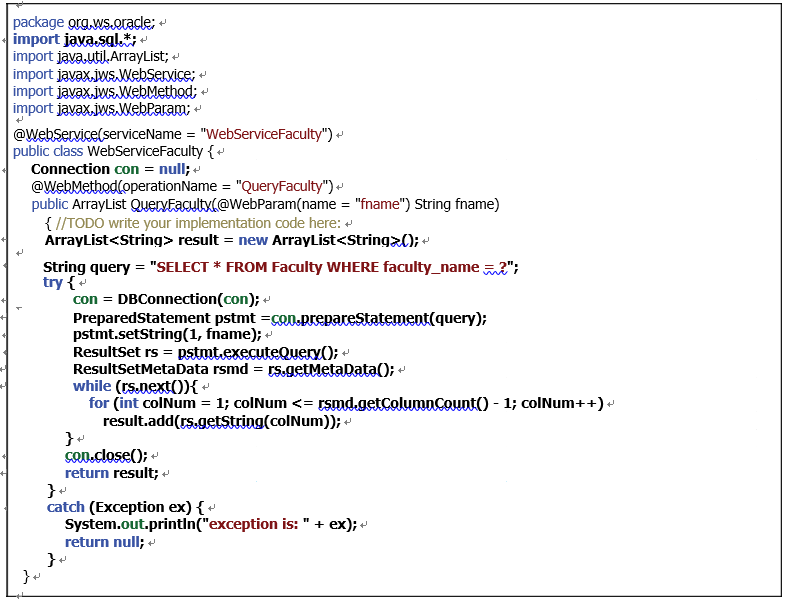
1) Query data from the Faculty Table in our Oracle database with QueryFaculty().
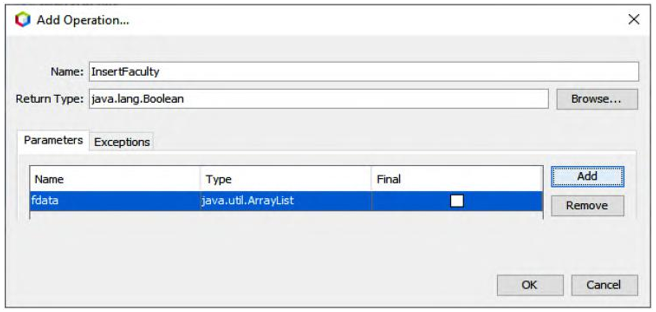
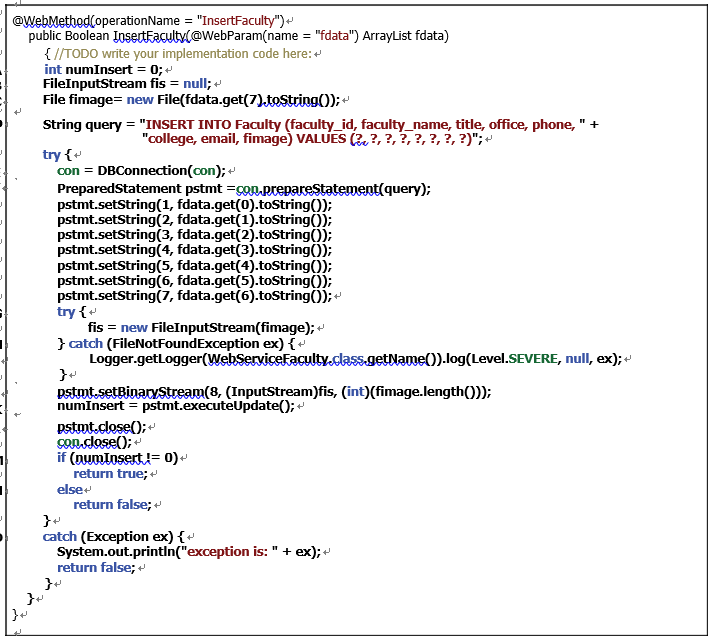
2) Insert data into the Faculty Table in our Oracle database with InsertFaculty().
3) Update and delete data against the Faculty Table in our Oracle database with the
UpdateFaculty() and DeleteFaculty() operations.
4) Query data from the Course Table in our Oracle database with QueryCourse().

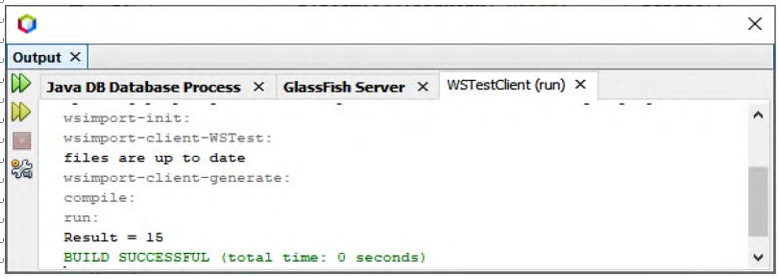
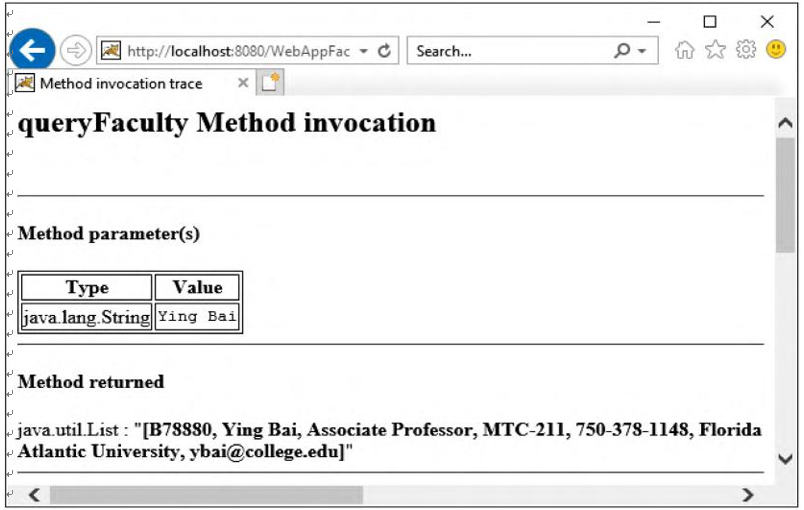
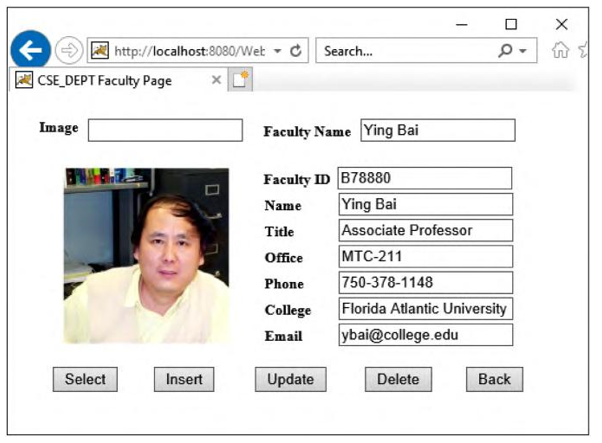
FIGURE 9.19  The run result of calling our Web service.

5) Query detailed course information from the Course Table in our Oracle database with
DetailCourse().

6) Update and delete data against the Course Table in our Oracle database with the
UpdateCourse() and DeleteCourse() operations.

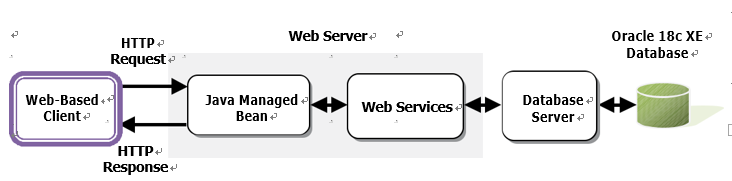
For each Web services project, we need to build an associated client project to consume the Web services project to test its function. The following client projects will be built:

1) Window-based client project to consume the Web service to access the Faculty and Course Tables in our Oracle database.
2) Window-based client project to consume the Web service to insert data into the Faculty and Course Tables in our Oracle database.

3) Window-based client project to consume the Web service to update and delete data against the Faculty and Course Tables in our Oracle database.
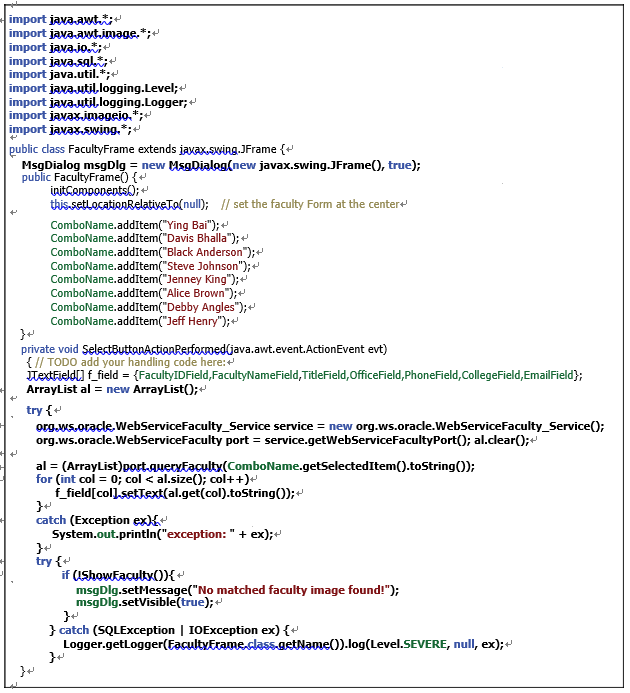
4) Web-based-based client project to consume the Web service to access the Faculty and Course Tables in our Oracle database.

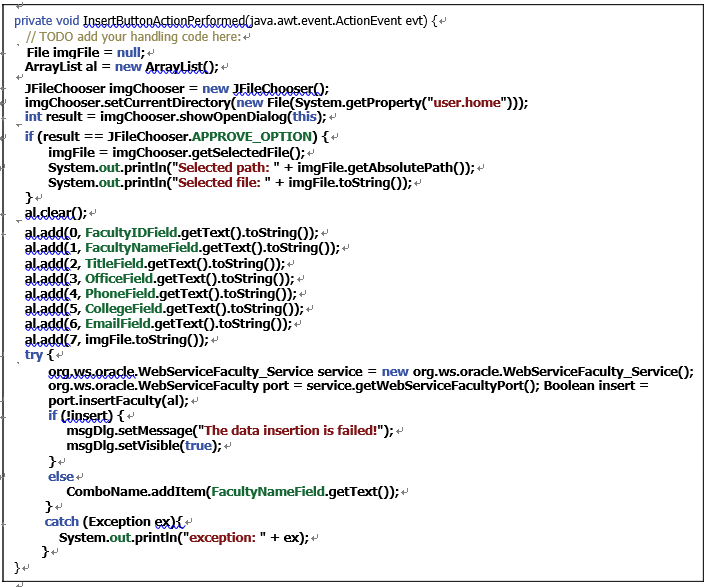
5) Web-based-based client project to consume the Web service to insert data into the Faculty and Course Tables in our Oracle database.

6) Web-based-based client project to consume the Web service to update and delete data against the Faculty and Course Tables in our Oracle database.

In fact, we can develop any kind of client project to consume a Web service, either a standard Java desktop application, which is called a Window-based consume project, or a JSP page, which is called a Web-based consume project. We will develop and build different client projects to consume our Web services to enable our projects to meet real-world needs.

Let’s start with the query of the Faculty Table in our Oracle database.

Create a New Java SOAP-Based Web Service Project WebServiceFaculty 2 – Develop Java Web Services to Access Databases

A. The java.sql library is first imported, since we need to use some of its components to con-nect to and implement in our sample Oracle database.

B. First a class-level variable, con, is created. This variable is used to hold the connection instance to our sample Oracle database, CSE _ DEPT.

C. An ArrayList instance, result, is created and used to collect and store our query result and return to the consuming project. The reason we used an ArrayList and not a List is that the former is a concrete class, but the latter is an abstract class, and a runtime exception may be encountered if an abstract class is used as a returned object to the calling method.

D. The data query statement is created with a positional parameter as the dynamic parameter for the query criterion faculty _ name.
E. The user-defined method DBConnection() that will be built later is called to setup a connection between our Web service and our sample database. A connection instance, con, is returned after the execution of this method.
F. A new PreparedStatement instance, pstmt, is declared and created to perform the query.
G. The setString() method is used to setup the actual value that is our input faculty name for the positional parameter faculty _ name.
H. The query is performed by calling the executeQuery() method, and the query result is returned and stored in a ResultSet object, rs.

FIGURE 9.24   The code for the new operation, QueryFaculty().

I. To get more related information about the queried database, the getMetaData() method is executed, and the result is stored in a ResultSetMetaData instance, rsmd.
J. while() and for() loops are used to pick up each column from the queried result that is stored in the ResultSet object rs. In fact, the while() loop only runs one time since only one matching faculty row will be returned. The getColumnCount() method is used as the upperbound of the for() loop, but this upper bound must be decreased by 1 since totally there are eight (8) columns in the Faculty Table, but we only need to query and pick up the first seven (7) columns. The last column is the faculty image object, but it can-not be added into the ArrayList as a String object. Thus, this query only returns the first seven columns in a matching faculty row.

K. The close() method is executed to disconnect from our sample database.

L. The queried result is returned to the calling method.
M. The catch block is used to track and display any exception during the data query process, and a null will be returned if one occurs.

During the coding process, you may encounter some runtime compiling errors. The main reason for those errors is that some packages are missing. To fix these errors, just right-click on any space inside this code window, and select the Fix Imports item to add those miss-ing packages.

Now let’s build our user-defined method, DBConnection(), to setup a connection to our sam-ple database from our Web service project.

FIGURE 9.25   The code for the user-defined method DBConnection().

Setup the Correct JDBC Driver and Java Platform for Our Web Service – Develop Java Web Services to Access Databases

9.5.6  Setup the Correct JDBC Driver and Java Platform for Our Web Service

Perform the following steps to complete the JDBC Driver setup process:

1) Right-click on our project, WebAppFaculty, in the Projects window and select the Properties item to open the project properties wizard.
2) Click on the Libraries node and click on the Add JAR/Folder button to open the Windows Explorer to locate our installed JDBC Driver for Oracle 18c XE, ojdbc8.jar.

3) Browse to the location where the JDBC Driver is installed (refer to Appendix H to down-load this driver). In our case, it is C:\Temp. Click the file ojdbc8.jar to select it and click on the Open and OK buttons to add it into our project.

4) Click on the drop-down arrow on the right of the Java Platform box, select JDK 1.8 and click on the Change Platform button in the popup menu to make this change valid.

Your finished Project Properties wizard should match the one shown in Figure 9.28.

Click on the OK button to complete the JDBC driver addition operation.

9.5.7  Deploy the Web Service Project and Test the Data Query Function

Perform the following operations to build and deploy our Web service project:

1) Click on the Clean and Build Main Project button to build our Web service.
2) Right-click on our Web application, WebAppFaculty, and select the Deploy item to deploy our Web service. If everything is fine, a successful deployment result should be displayed, as shown in Figure 9.29.

3) To test this Web service, right-click on our target service output file, WebServiceFaculty, under the Web Services node in our project, and select the Test Web Service item.
4) The tested page is opened and displayed. Then enter a desired faculty name such as Ying Bai into the text field and click on the queryFaculty button to call our Web service. The run result is shown in Figure 9.30.

FIGURE 9.28  The finished Project Properties wizard.

FIGURE 9.29  The deployment result of our Web service project.

FIGURE 9.30  The test result of our Web service project.

It can be seen that all seven pieces of queried faculty information for the selected faculty member have been retrieved and displayed in the tester. Our data query for our Faculty Table is successful using our Web service.

Now let’s continue to test the second operation, QueryImage(), by clicking on the Back button to return to the original test page. Enter a desired faculty name such as Ying Bai in the text field and click on the queryImage button. The selected faculty image is [B@66c557e1.

Next we can develop a Windows or Web client project to consume this Web service to per-form a data query from the Faculty Table in our sample database. In fact, as we discussed in Section 9.3.5, we can develop different kinds of client projects to consume a Web service. In the fol-lowing sections, we will discuss two popular client projects, Window-based and Web-based clients, to consume our Web service to perform queries to our Faculty Table.

First let’s discuss how to build a Window-based client project to consume our Web service.

Create a Web Service Reference for Our Window-Based Client Project – Develop Java Web Services to Access Databases

9.6.2  Create a Web Service Reference for Our Window-Based Client Project

Perform the following operations to set up a Web service reference for our client project:

1) Build and deploy our Web Service application project, WebAppFaculty, first to make sure that the Web Service is available to our client project.

2) Right-click on our client project WinClientFaculty _ Select in the Projects window, and select the New > Other item to open the New File wizard.

3) In the opened New File wizard, select Web Services from the Categories and Web Service Client from the File Types list, respectively. Click on the Next button to continue.

4) Click on the Browse button for the Project field and expand our Web application proj-ect WebAppFaculty, and click on our Web service WebServiceFaculty to select it. Then click on the OK button to select this Web service. Your finished Web Service Client wizard should match the one shown in Figure 9.33.

5) Click on the Finish button to complete the Web service reference setup process.

Immediately, you can see a new node named Web Service References has been created and added to our client project. Expand this node, and you can see the associated Web service port and our Web service operations, such as QueryFaculty() and QueryImage(), under that node.

FIGURE 9.33  The finished New Web Service Client wizard.

Now let’s develop the code to call the Web service to perform the data query from the Faculty Table in our sample database.

9.6.3  Develop the Code to Call Our Web Service Project

The coding process is divided into two parts: the modification to the original code and creation of new code. First let’s do some modifications to the original code in the FacultyFrame class. Perform the following code modifications to make this project our Web consuming project:

1) Double-click on our new copied FacultyFrame.java file from our project to open it.
2) Click on the Source button at the top to open the code window.

3) Go to the constructor of this class, and remove all three query methods from the ComboMethod object.

4) Open the SelectButtonActionPerformed() event handler and remove all code inside this event handler.

Now let’s develop some new code to perform the faculty data query by calling our Web service operations.

In the Design view of the FacultyFrame form window, double-click on the Select button to open its event method, SelectButtonActionPerformed(). Then enter the code shown in Figure 9.34 into this method. The new added and modified code is in bold.
Let’s have a closer look at this piece of code to see how it works.

A. Some useful packages and classes related to Java development, such as image, imageio, swing and File, are imported first since we need to use some related classes defined in those packages to perform data and image queries and display in this Form.

B. A new ArrayList instance, al, is created to receive and hold the query result.
C. A try-catch block is used to call our Web service to perform the faculty data query operation. First a new Web service instance, service, is created based on our Web ser-vice class, WebServiceFaculty _ Service. Starting with NetBeans IDE 7, the syntax to create a new service has changed, and an underscore is used between the service class name and the Service keyword to represent the service class. Similarly, a service port is also generated by calling a system method, getWebServiceFacultyPort(), to get the current port used by our Web service. This port is returned and assigned to a new port instance, port.

FIGURE 9.34   The modified code for the SelectButtonActionPerformed() method.

Build and Run Our Client Project to Query Faculty Data via Web Service – Develop Java Web Services to Access Databases

9.6.4   Build and Run Our Client Project to Query Faculty Data via Web Service

Prior to building and running our client project, make sure that our Web Service application project, WebAppFaculty, has been built and deployed. Click on the Clean and Build Main Project button to build our client project. If everything is fine, click on the Run Main Project button to run our client project.

A message box may pop up to request the main starting class. Just select our FacultyFrame class as the starting class, and click on the OK button to run the project. The FacultyFrame form window is displayed, as shown in Figure 9.36.

Select a desired faculty member, such as Debby Angles, from the Faculty Name combo box, and click on the Select button to query the detailed information for this faculty member via our Web service WebServiceFaculty. The queried result is displayed in the form, as shown in Figure 9.36. You can try to select any other faculty member to test the faculty data query function to confirm the correctness of our client and service projects.

Next let’s build a Web-based client project to consume our Web service WebServiceFaculty to perform a faculty data query action.

FIGURE 9.36   The run result of our client project.

FIGURE 9.37   The architecture of our Web-based client project.

9.7   BUILD A WEB-BASED CLIENT PROJECT TO CONSUME THE WEB SERVICE

To save time and space, we can use some components in the Web application project JavaWebOracleSelect we developed in Chapter 8 to build our Web-based client-consuming proj-ect WebClientFaculty _ Select in this section. In fact, we will use the Faculty.jsp and FacultyProcess.jsp files to build this Web-based consuming project to query faculty data from our sample Oracle database.

The structure of this Web-based client project is shown in Figure 9.37.

Create a Web-Based Client Project WebClientFaculty _ Select – Develop Java Web Services to Access Databases

9.7.1  Create a Web-Based Client Project WebClientFaculty _ Select

Perform the following steps to create a new Web application project, WebClient Faculty _ Select:

1) Launch NetBeans IDE 12.0 and go to File > New Project to open the New Project wizard. Expand the Java with Ant folder and select Java Web from the Categories list and Web Application from the Projects list. Click theNext button to go to the next wizard.
2) Enter WebClientFaculty _ Select into the Project Name field as this new proj-ect’s name. Select a desired folder, such as C:\Class DB Projects\Chapter 9, to save this project in the Project Location field, and click on the Next button.

3) In the opened Server and Settings wizard, make sure that GlassFish Server has been selected as the Web server for this Web application and Java EE 7 Web ver-sion has been also selected for this project. Click on the Next button to continue.

4) In the next wizard, Frameworks, just click on the Finish button to complete the new Web application creation process.

Since we need a Faculty page as a view to query data from the Faculty Table in our sample database, we need to add the Faculty.jsp and FacultyProcess.jsp files we built in the proj-ect JavaWebOracleSelect in Chapter 8 into our current project. Perform the following opera-tions to complete the Web page addition process:

1) Open the NetBeans IDE 12.0 and the project JavaWebOracleSelect that is located in the Class DB Projects\Chapter 8 folder in the Students folder on the CRC Press ftp site, and copy two files, Faculty.jsp and FacultyProcess.jsp, from the Web Pages folder.

2) Open our new project, WebClientFaculty _ Select, and paste the two copied files from step 1 into the folder Web Pages under our new project, WebClientFaculty _ Select.

Next we need to create a Java managed bean class, FacultyMBean.java, copy the code from the managed bean FacultyQuery.java we built in the Web application project JavaWebOracleSelect and paste it into our managed bean class FacultyMBean.java in our Web-based client project.

9.7.2  Create a Java Managed Bean Class, FacultyMBean

Perform the following operations to create the Java managed bean in our current project:

1) Right-click our Web-based client project, WebClientFaculty _ Select, in the Projects window and select New > Java Class item to open the New Java Class wizard.

2) In the opened wizard, enter FacultyMBean into the Class Name field and enter web-client into the Package field.
3) Then click on the Finish button to complete the Java managed bean creation process.
4) Double-click on our new created managed bean, FacultyMBean.java, to open its code window.

5) Now open the Web application project JavaWebOracleSelect we built in Chapter 8. You can find and download this project in the folder Class DB Projects\Chapter 8 in the Students folder at the CRC Press ftp site (refer to Figure 1.2 in Chapter 1).

6) Expand the package JavaWebOracleSelectPackage and copy all code inside the man-aged bean class FacultyQuery.java (exclude the imported packages at the top of this file).
7) In our opened managed bean FacultyMBean.java, paste all copied code inside this class.

Let’s first do some initial modifications to the FacultyMBean.java class file to make it our new Java Bean class (more modifications will be made later):

1) Change the class name from FacultyQuery to FacultyMBean. Change the construc-tor’s name from FacultyQuery() to FacultyMBean().
2) Remove the class MsgDialog and its object msgDlg code line, since we need to use theSystem.out.println() to replace it.
3) Replace all msgDlg.setMessage() and msgDlg.setVisible() with System. out.println() method.

4) Remove all original code inside the FacultyMBean class constructor.

Build and Run Our Client Project to Query Faculty Data via Web Service – Develop Java Web Services to Access Databases

9.7.5   Build and Run Our Client Project to Query Faculty Data via Web Service

Click on the Clean and Build Main Project button to build our client project. If every-thing is fine, click on the Run Project button on the top (green arrow) to run our client project.

On the opened Web page, which is shown in Figure 9.41, enter a desired faculty name such as Ying Bai into the Faculty Name field. Then click the Select button to perform a query for this selected faculty member. The query result is returned and displayed in this page, as shown in Figure 9.41. Click on the Back button to terminate this project if you like.

Our Web client project used to consume our Web service WebServiceFaculty is success-ful! A complete Web client project, WebClientFaculty _ Select, can be found in the project folder Class DB Projects\Chapter 9 in the Students folder on the CRC Press ftp site (refer to Figure 1.2 in Chapter 1).

Next, let’s discuss how to build a Web service to perform data insertion into our sample Oracle database.

9.8  BUILD JAVA WEB SERVICES TO INSERT DATA INTO THE ORACLE DATABASE

To perform a faculty record insertion to our sample database using our Web service, we need to add another operation called InsertFaculty() into our Web service project, WebServiceFaculty.

FIGURE 9.41   The test result for our Web client project.

9.8.1  Add a New Operation InsertFaculty() into Our Web Service Project

Perform the following operations to add this operation into our Web service:

1) Launch NetBeans IDE 12.0 and open our Web application project, WebAppFaculty, and open our Web service main class file, WebServiceFaculty.javainthe Projects window.
2) Click on the Design button at the top of the window to open the Design View of our Web service class file WebServiceFaculty.java.
3) Click on the Add Operation button to open the Add Operation wizard.
4) Enter InsertFaculty into the Name field and click on the Browse button that is next to the Return Type combo box. Type boolean into the Type Name field, select the item Boolean (java.lang) from the list and click on the OK button.

5) Click on the Add button and enter fdata into the Name parameter field. Then click on the dropdown arrow of the Type combo box and select the Choose item to open the Find Type wizard. Type Arraylist into the top field and select the ArrayList (java.util) data type, and click on the OK button to select an ArrayList as the data type for the input parameter.

Your finished Add Operation wizard should match the one shown in Figure 9.42. Click on the OK button to complete the new operation creation process.

Click on the Source button on the top of this window to open the code window of our Web service class file. Let’s build the code for this new added operation.
In the opened code window, enter the code shown in Figure 9.43 into this new added operation, InsertFaculty().
Let’s have a closer look at this piece of code to see how it works.

A. First a local integer variable, numInsert, is created, and it is used to hold the run result of inserting a new faculty record into our sample database.

FIGURE 9.42  The complete Add Operation wizard.

Build and Run Our Client Project to Query Faculty Data via Web Service 2 – Develop Java Web Services to Access Databases

FIGURE 9.43   The code for the new operation, InsertFaculty().

B. An instance of the FileInputStream class, fis, is generated, and it is used to convert the inserted faculty image to a FileInputStream format and inserted into the database
later.
C. A new File instance, fimage, is also declared and initialized with the path or loca-tion of the inserted faculty image, which is located at the eighth position with an index of 7 in the input ArrayList that contains all eight pieces of inserted faculty information.

D. The INSERT query string is generated with eight pieces of inserted faculty information represented by eight position parameters.

E. A try-catch block is used to start this insertion action. First a valid database connec-tion is established by calling a user-defined method, DBConnection().
F. A new instance of PreparedStatement class, pstmt, is declared with seven setString() methods to set up the actual values for seven positional dynamic parameters in the insert query statement. One point to be noted is that the order of these setString() methods must be identical to the order of columns in our Faculty Table.

G. Another try-catch block is used to convert the inserted faculty image to the FileInputStream format and make it ready to be written into the database.

H. The catch block is used to check any possible exception for this conversion.

I. The exception information will be recorded into a system log file if one occurs.

J. The converted faculty image is written into the eighth positional dynamic parameter via a setBinaryStream() system method.
K. The insert action is performed by calling the executeUpdate() method, and the insert result is returned and stored in the local integer variable numInsert.

L. Some used instances, including the PreparedStatement and Connection classes, are closed since we have completed our data insertion and need to disconnect our database.
M. The executeUpdate() method will return an integer to indicate whether this data insertion is successful. If a non-zero value is returned, which means that at least one row has been inserted into our Faculty Table and this data insert action is successful, a true is returned to the client project.

N. Otherwise, no row has been inserted into our sample database, and the data insertion fails. A false is returned for that situation.
O. The catch block is used to track and display any exception during this data insert opera-tion, and a false will be returned if one occurs.

You may experience some compiling errors during this coding process, which is normal, and all of these errors are due to missing imported packages. To fix them, just right-clickany place inside the code window and select the Fix Imports item from the popup menu.

At this point, we have completed all code development for the data insertion action. Now let’s build and run our Web service project to test its function.

Deploy the Web Service Project – Develop Java Web Services to Access Databases

9.8.2   Deploy the Web Service Project

Perform the following operations to build and deploy our Web service project:

  1. Click on the Clean and Build Main Project button to build our Web service.
  2. Right-click on our Web application WebAppFaculty and select the Deploy item to deploy our Web service. If everything is fine, a successful deployment result should be displayed, as shown in Figure 9.44.

FIGURE 9.44   The deployment result of our Web service project.

A problem arises when testing this Web service project using the tester page, which is the input parameter array, fdata. As we know, fdata has a data type of ArrayList, and it needs to 1) create an ArrayList instance and then 2) assign a set of faculty information to that ArrayList object to call the Web service operation InsertFaculty() to perform the faculty data insertion. However, it is difficult to do those two operations manually by using this tester page. Therefore, we need to create a Web client project to consume and test this Web service project.

We can develop a client project to consume this Web service to perform data insertion to the Faculty Table in our sample database. First let’s discuss how to build a Window-based client project to consume our Web service.

9.9  BUILD A WINDOW-BASED CLIENT PROJECT TO CONSUME THE WEB SERVICE

We can still use the Window-based client project WinClientFaculty _ Select we built in Section 9.6 to consume the Web service to perform the faculty data insert action. One point to be noted is that although a Web reference to our Web service was established in Section 9.6, we still need to refresh this Web reference since our Web service project has been modified by adding one more operation, InsertFaculty(). Otherwise we may encounter an exception, since the origi-nal Web service that does not include the InsertFaculty() operation.
To make things clear, we can copy the project WinClientSelect, rename it as our new Windows-based client project WinClientFaculty _ Insert and use this project to consume our Web Service project to insert a new faculty record into the Faculty Table in our sample database.

Perform the following operations to rename the project:

1) Right-click on our original Windows-based client project, WinClientFaculty _ Select, and select the Copy item from the popup menu to open the Copy Project wizard.
2) Change the project name to WinClientFaculty _ Insert in the Project Name box, and click on the Copy button to complete the project copy operation.

Now you may find that our copied project contained some errors with red error indicators. The reason for that is because of our Web Service, since we need to update our Web Service Reference for the new project WinClientFaculty _ Insert.

Refresh the Web Service Reference for Our Window-Based Client Project 2 – Develop Java Web Services to Access Databases

FIGURE 9.45   The code for the Insert button event handler.

H. The add() method is used to pick up and add eight pieces of new faculty information into this new ArrayList instance, al. These eight pieces of new faculty information are entered by the user and stored in seven text fields and a File Chooser in the FacultyFrame window form. The toString() method is used to convert each piece of new faculty information obtained using the getText() method that returns an object data type to a String. The index is necessary since it is used to indicate the position of each parameter in this ArrayList. One point to be noted is the order of adding these text fields, which must be identical to the order of data columns in our Faculty Table.
I. A try-catch block is used to call our Web service operation, InsertFaculty(), to perform the faculty data insert action. First a new Web service instance, service, is created based on our Web service class, WebServiceFaculty _ Service. Then the getWebServiceFacultyPort() method is executed to get the current port used by our Web service. This port is returned and assigned to a new port instance, port.

J. The Web service operation InsertFaculty() is executed with the ArrayList instance al that has been filled with eight pieces of new faculty information as the argument of this method. The run result of that operation is returned and assigned to a Boolean variable, insert.

K. If the value of the variable insert is false, which means that no row has been inserted into our Faculty Table and this insertion has failed, the msgDlg instance is used to show this situation.

L. Otherwise, if the value of the insert variable is true, which means that this data inser-tion is successful, the new inserted faculty name will be added into the Faculty Name combo box ComboName using the addItem() method.

M. The catch block is used to track and display any possible exception during the Web ser-vice operation execution.

Now we are ready to build and run our client project to test its function.