Refresh the Web Service Reference for Our Window-Based Client Project – Develop Java Web Services to Access Databases

9.9.1  Refresh the Web Service Reference for Our Window-Based Client Project

In order to call the InsertFaculty() operation in our Web service project, WebService Faculty, we need to refresh the Web reference in our Window-based client project to use the updated Web service project. Perform the following operations to refresh the Web service reference:

1) Build and deploy our Web Service application, WebAppFaculty, to make it available.
2) Open our Window-based client project, WinClientFaculty _ Insert, and expand
the Web Service References node.
3) Right-click on our Web service, WebServiceFaculty, and choose the Delete item to remove this old Web reference.
4) Right-click on our Window-based client project, WinClientFaculty _ Insert, and select the New > Web Service Client item to open the New Web Service Client wizard.
5) In the opened wizard, click on the Browse button next to the Project field and expand our Web application, WebAppFaculty. Then choose our Web service, WebServiceFaculty, by clicking on it, and click on the OK button.
6) Click on the Finish button to complete the Web service reference refresh process.

Now that we have refreshed or updated the Web service reference for our Window-based client project WinClientFaculty _ Insert, next let’s develop the code in our client project to call the Web service operation InsertFaculty() to perform faculty data insertion.

9.9.2  Develop the Code to Call Our Web Service Project

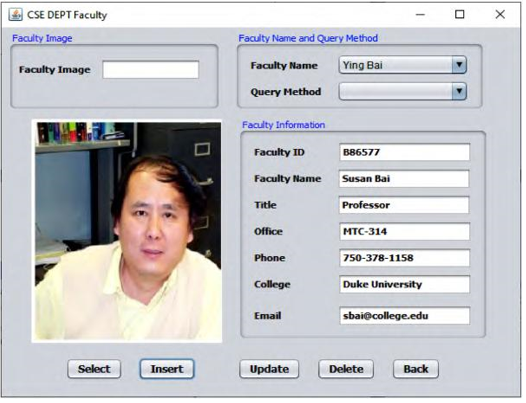
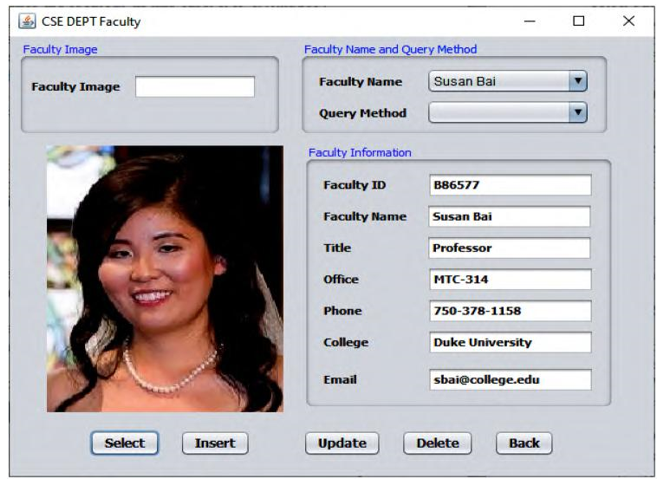
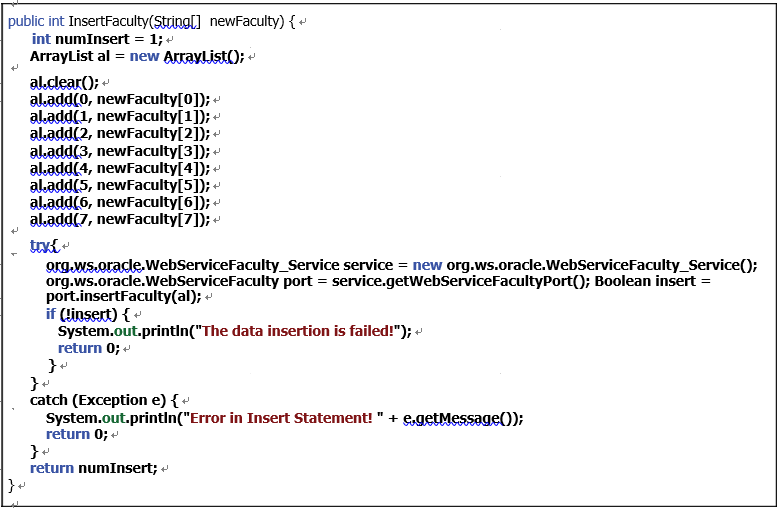
Open the Window-based client project WinClientFaculty _ Insert and double-click on our main class, FacultyFrame.java, to open it. Click on the Design button to open the graphic user interface. In this client project, we want to use the Insert button in this form as a trigger to start the faculty data insertion action. Therefore, double-click on the Insert button to open its event method, InsertButtonActionPerformed(), and enter the code shown in Figure 9.45 into this method.
Let’s have a closer look at this piece of code to see how it works.

A. Some local objects are first declared, which include a File object, imgFile, which is used to hold the selected image file, and a new ArrayList instance, al, which is used to pick up and reserve the input new faculty data array.

B. A Java File Chooser instance, imgChooser, is generated, and it provides a file interface GUI to allow users to select a desired faculty image to be inserted into our database later.

C. The current directory, which is the folder of our current project, is selected, and this loca-tion will work as a default folder to store all selected faculty image files later.

D. The system method, showOpenDialog(), is executed to display the Chooser GUI to enable users to browse and select a desired faculty image to be inserted into our database later.
E. By checking one property, APPROVE _ OPTION, one can confirm whether the GUI oper-ation is successful. If it is opened and an image has been selected, a true is returned. Then the selected image can be retrieved by calling a method, getSelectedFile().

F. These two code lines are used to display the path and directory for the selected faculty image, and they are used for debugging purposes.

G. The clear() method is executed to make sure that the ArrayList instance is clean and empty before a new faculty record can be assigned to it.

Build and Run Our Client Project to Insert Faculty Data via Web Service – Develop Java Web Services to Access Databases

9.9.3   Build and Run Our Client Project to Insert Faculty Data via Web Service

One more step we need to do prior to building and running our project is to reserve all faculty image files since we need to insert a new faculty member with a new image file. All faculty image files can be found in the folder Images\Faculty in the Students folder on the CRC Press ftp site (refer to Figure 1.2 in Chapter 1). you can copy those files from that folder and save them to a folder on your local machine, such as C:\Images\Faculty.

Now click on the Clean and Build Main Project button to build our client project. If everything is fine, click on the Run Main Project button to run our client project.

The FacultyFrame form window is displayed. First let’s perform a faculty query action. Select

a desired faculty member, such as Ying Bai, from the Faculty Name combo box, and click on the Select button to query the detailed information for this faculty member via our Web service WebServiceFaculty. The queried result is displayed in seven text fields.

Now enter a new faculty record with the seven pieces of new faculty information shown into seven text fields, which is shown in Figure 9.46.

Faculty ID:B86577
Faculty Name:Susan Bai
Title:Professor
Office:MTC-314

FIGURE 9.46   The seven pieces of new inserted faculty information.

FIGURE 9.47   The retrieved new inserted faculty record.

Phone:750–378–1158
College:DukeUniversity
Email:[email protected]

Click on the Insert button to open the File Chooser wizard. In the opened File Chooser wizard, browse to the location where all faculty image files are located, in this case C:\Images\ Faculty; select the desired image, White.jpg; and click on the Open button to select this faculty image and insert it into the Faculty Table in our sample database.

To confirm this data insertion, two methods can be used. First we can use the Select button in this form to perform a query to try to retrieve the inserted faculty record. To do this, go to the Faculty Name combo box, and you can see that the new faculty name, Susan Bai, has been added into this box. Click to select it and click on the Select button. The new inserted faculty record is retrieved and displayed in this form, as shown in Figure 9.47. Click on the Back button to terminate our client project.

The second way to confirm this data insertion is to open our Faculty Table using either the Services window in the NetBeans IDE or the Oracle SQL Developer to check whether the new faculty record has been inserted. To do that using the Services window in the NetBeans IDE, performing the following operations:

1) Open the Services window and expand the Databases node.
2) Right-click on our sample Oracle database URL: jdbc:oracle:thin:@local host:1521:XE;, and select the Connect item to connect to our database. You may need to enter a valid password, oracle _ 18c, to complete the database connection action.

3) Expand our sample database, CSE _ DEPT, and Tables.
4) Right-click on the Faculty Table and select the View Data item.

FIGURE 9.48   The opened Faculty Table in the NetBeans IDE.

Your opened Faculty Table is shown in Figure 9.48. It can be seen that the new faculty record, Susan Bai, with the faculty _ id of B86577, which is located in the fourth row, indicated by the dark color in this Table, has been successfully inserted into our database.

Next let’s build a Web-based client project to consume our Web service to insert a new faculty record into the Faculty Table in our sample database.

Develop the Code to Call Our Web Service Project 2 – Develop Java Web Services to Access Databases

The code related to steps 1~5 is shown in steps 1~4 in Figure 9.50. Add the Java code shown in steps A~E in Figure 9.50 into this block.

Let’s have a closer look at this code to see how it works.

A. An additional system method, getParameter(), is used to get the name of the selected faculty image, which is located at the Faculty _ Image tag in the view class Faculty. jsp. The name of the selected faculty image will be automatically assigned and stored to the Faculty _ Image tag in the view class as soon as the image is selected.

B. A new String array, fnew, is created, and it is used to hold eight pieces of new faculty information stored in the eight local String variables.
C. The InsertFaculty() method defined in our Java Bean is executed to insert these eight pieces of faculty information as a new faculty record into the Faculty Table. The eight pieces of new faculty information are stored in the String array fnew that works as the argument for this method. The run result of this method is returned and assigned to the local integer variable res.

D. If the run result is 0, it means that no record has been inserted into the Faculty Table, and this data insertion fails. In that case, we need to re-display the Faculty.jsp page to enable users to re-insert the faculty record.

E. If the run result is non-zero, it means that the new faculty record has been inserted into the Faculty Table. We need to clean up all seven fields that contain seven pieces of new inserted faculty information in the Faculty.jsp page to enable users to either test this insertion or insert another faculty record. A for() loop is used for that purpose.

Now let’s do our code for the Java managed bean class FacultyMBean.java.
Open our Web-based client project, WebClientFaculty _ Insert, and double-click on the FacultyMBean.java in the Projects window to open the managed bean class file. Let’s develop the code for the Insert() method in this class to fulfill this data insertion function.

Browse to the Insert() method and enter the code, as shown in Figure 9.51, into this method.

Let’s have a closer look at this code to see how it works.

A. Some local variables, such as an integer variable numInsert and an ArrayList instance al, are created. The first variable is used to hold the run result of this data insertion, and the second variable is used to pick up and reserve the input new faculty data array.

B. The clear() method is executed to make sure that the ArrayList instance is clean before a new faculty record is collected.

C. The add() method is used to pick up and add eight pieces of new faculty information into this new ArrayList instance al. Eight pieces of new faculty information are entered and selected by the user in the JSP page Faculty.jsp and stored in eight tags defined in the view class Faculty.jsp page.

D. A try-catch block is used to call the data insertion operation InsertFaculty() defined in our Web Service project. First a service instance with its service port is generated.

E. The InsertFaculty() operation in our Web service is called with the ArrayList instance that contains eight pieces of new faculty information as the argument. The exe-cution result of this faculty data insertion is returned and assigned to the local Boolean variable insert.

F. If the returned Boolean variable insert is false, which means that this data insertion fails, a system method, System.out.println(), is used to indicate this.

G. The catch block is used to catch any possible exception during the data insertion process.
H. Finally the run result of this data insertion is returned to the calling method.

Now let’s build and run our Web client project to call our Web service operation to perform the faculty data insert action.

FIGURE 9.51   The modified code for the Insert() method.

Develop the Code to Call Our Web Service Project – Develop Java Web Services to Access Databases

9.10.2  Develop the Code to Call Our Web Service Project

To call our Web Service project to insert a new faculty record into the Faculty Table in our sample database, we need to perform the following code modification and development:

1) Modify the view class Faculty.jsp file to add a File Selection function to enable users to select a new faculty image to be inserted into the database.

2) Modify the control class FacultyProcess.jsp page to direct the insert query to the related operational method defined in the Java Bean class FacultyMBean. java file.

3) Create and add code into the model class FacultyMBean.java to call the related opera-tion, InsertFaculty(), defined in our Web Service to perform data insertion actions.

Let’s handle these tasks one by one in the following section. First let’s modify the view class Faculty.jsp by adding a File Selection function. Refer to Section 8.5.1 in Chapter 8 to perform this modification. For your convenience, we highlight the related modifications for that page in this part again. Perform the following steps to add this function:

1) Open the Faculty.jsp page and scroll down this file to find one of the input tags, which should be around line 381:
2) Enter the following tag and locate it just above the tag shown previously.

Your modified Faculty.jsp page should match the one shown in Figure 9.49. The new added tag part is in bold.

Next let’s modify the controller class FacultyProcess.jsp file to direct the insert query to the related method defined in that class.

Open the controller class file, FacultyProcess.jsp, and perform the following modifica-tions, as shown in Figure 9.50, to that file.

FIGURE 9.49   The modified code for the Faculty.jsp page.

FIGURE 9.50  The modified and added code for the Insert block in FacultyProcess.jsp.

1) Move cursor to the else if (request.getParameter(“Insert”)!= null) block, then type a JSP ending tag, %> under the else if statement, and click on the Enter key from the keyboard to get a new line under the else if block. Keep the cur-sor in that new line location.

2) Open the Palette window by going to Window > IDE Tools > Palette item. In the opened Palette window, browse to the JSP tab, expand it and drag the Use Bean icon and place it under the JSP ending tag %>.

3) In the opened Insert Use Bean dialog, enter InsertFaculty into the ID field and webclient.FacultyMBean into the Class field. Select session from the Scope combo box. Click on the OK button to close this dialog box.

4) Add a JSP directive just under the previous JSP directive to set up all properties on the Java bean class FacultyMBean.java:

5) Add an opening JSP directive <% to start our Java code to be built in the following.

BUILD JAVA WEB SERVICE TO UPDATE AND DELETE DATA FROM THE ORACLE DATABASE 2 – Develop Java Web Services to Access Databases

Let’s have a closer look at this piece of code to see how it works.

A. A local integer variable, numUpdated, is created first, and this variable is used to hold the run result of execution of the data update operation.

B. An instance of the FileInputStream class, fis, is generated and it is used to convert the updated faculty image to a FileInputStream format, and the converted image file can be updated to the database later.

C. A new File instance, fimage, is also declared and initialized with the path or location of the updated faculty image, which is located at the sixth position with an index of 6 on the input ArrayList that contains all eight pieces of updated faculty information. A point to be noted is that the variable in the seventh position (7) in the input ArrayList is the faculty _ id parameter.
D. The update query string is created with eight positional parameters. The query criterion is the faculty _ id that is the eighth positional parameter and placed after the WHERE clause.

E. A try-catch block is used to perform this data update action. First a user-defined method, DBConnection(), is called to set up a connection between our Web service and our sample database. A connection instance, con, is returned after the execution of this method.

F. A new PreparedStatement instance, pstmt, is created to perform this update query.

G. Seven setString() methods are used to set up the actual values for the seven positional dynamic updated parameters in the update query statement. One point to be noted is that the order of these setString() methods is not continuous from 1 to 8 because the sev-enth positional parameter is the updated faculty image, which will be processed separately, and the eighth positional parameter is the faculty _ id.

H. Another try-catch block is used to convert the updated faculty image to the FileInputStream format and make it ready to be written into the database.

I. The catch block is used to check any possible exception for this conversion. The excep-tion information will be recorded into a system log file if it occurs.
J. The converted faculty image is written into the seventh positional dynamic parameter via a setBinaryStream() system method.
K. The update action is performed by calling the executeUpdate() method, and the update result is returned and stored in the local integer variable numUpdated.
L. The database connection is closed by executing the close() method since we have com-pleted our data update action and need to disconnect our database.

M. The executeUpdate() method will return an integer to indicate whether this data update is successful or not. If a non-zero value is returned, which means that at least one row has been updated in our Faculty Table and this data update action is successful, a true is returned to the client project.

N. Otherwise, if a zero is returned, it means that no row has been updated in our sample data-base and this data update fails. A false is returned for this situation.
O. The catch block is used to track and display any exception during this data update pro-cess, and a false will be returned if one occurs.

Before we can build a Window-Based or Web-Based project to consume this Web Service proj-ect to test the data update function, let’s take care of the code for the data delete action against our sample database using the Web service operation DeleteFaculty().

BUILD JAVA WEB SERVICE TO UPDATE AND DELETE DATA FROM THE ORACLE DATABASE – Develop Java Web Services to Access Databases

9.11  BUILD JAVA WEB SERVICE TO UPDATE AND DELETE DATA FROM THE ORACLE DATABASE

It is straightforward to perform data update and delete actions against our sample Oracle data-base via Web service, and we can add two more new operations, UpdateFaculty() and DeleteFaculty(), into our Web service project WebServiceFaculty we built in the previous sections. First let’s concentrate on the faculty data update action.

One key point to be noted when performing a data update action is that in most real applications, a completed faculty record should be updated, except the faculty _ id, since it is much easier to insert a new faculty record with a new faculty _ id than to update a record with an updated faculty _ id because of the complexity in cascaded update relationships we built in Chapter 2 when we created our sample database. Therefore, in this section, we will concentrate on the updat-ing a faculty record based on an existing faculty _ id.

9.11.1  Add a New Operation UpdateFaculty() to Perform Faculty Data Update

Perform the following operations to add a new operation, UpdateFaculty(), into our Web ser-vice project, WebServiceFaculty:
1) Launch NetBeans IDE 12.0 and open our Web application project, WebAppFaculty, and our Web service main class file, WebServiceFaculty.java, in the Projects window.

2) Click on the Design button at the top of the window to open the Design View of our Web service class file, WebServiceFaculty.java.
3) Click on the Add Operation button to open the Add Operation wizard.
4) Enter UpdateFaculty into the Name field and click on the Browse button next to the Return Type combo box. Type boolean into the Type Name field and select the item Boolean (java.lang) from the list, and click on the OK button.

5) Click on the Add button and enter fdata into the Name parameter field. Then click on the dropdown arrow of the Type combo box, and select the Choose item to open the Find Type wizard. Type Arraylist into the top field and select the ArrayList (java. util) data type, and click on the OK button to select an ArrayList as the data type for the input parameter.

Your finished Add Operation wizard should match the one shown in Figure 9.55. Click on the OK button to complete the new operation creation process.

Click on the Source button on the top of this window to open the code window of our Web service project. Let’s develop the code for this new added operation.
In the opened code window, enter the code shown in Figure 9.56 into the new operation.

FIGURE 9.55   The complete Add Operation wizard.

FIGURE 9.56   The code for the new operation, UpdateFaculty().