9.5.6 Setup the Correct JDBC Driver and Java Platform for Our Web Service
Perform the following steps to complete the JDBC Driver setup process:
1) Right-click on our project, WebAppFaculty, in the Projects window and select the Properties item to open the project properties wizard.
2) Click on the Libraries node and click on the Add JAR/Folder button to open the Windows Explorer to locate our installed JDBC Driver for Oracle 18c XE, ojdbc8.jar.
3) Browse to the location where the JDBC Driver is installed (refer to Appendix H to down-load this driver). In our case, it is C:\Temp. Click the file ojdbc8.jar to select it and click on the Open and OK buttons to add it into our project.
4) Click on the drop-down arrow on the right of the Java Platform box, select JDK 1.8 and click on the Change Platform button in the popup menu to make this change valid.
Your finished Project Properties wizard should match the one shown in Figure 9.28.
Click on the OK button to complete the JDBC driver addition operation.
9.5.7 Deploy the Web Service Project and Test the Data Query Function
Perform the following operations to build and deploy our Web service project:
1) Click on the Clean and Build Main Project button to build our Web service.
2) Right-click on our Web application, WebAppFaculty, and select the Deploy item to deploy our Web service. If everything is fine, a successful deployment result should be displayed, as shown in Figure 9.29.
3) To test this Web service, right-click on our target service output file, WebServiceFaculty, under the Web Services node in our project, and select the Test Web Service item.
4) The tested page is opened and displayed. Then enter a desired faculty name such as Ying Bai into the text field and click on the queryFaculty button to call our Web service. The run result is shown in Figure 9.30.
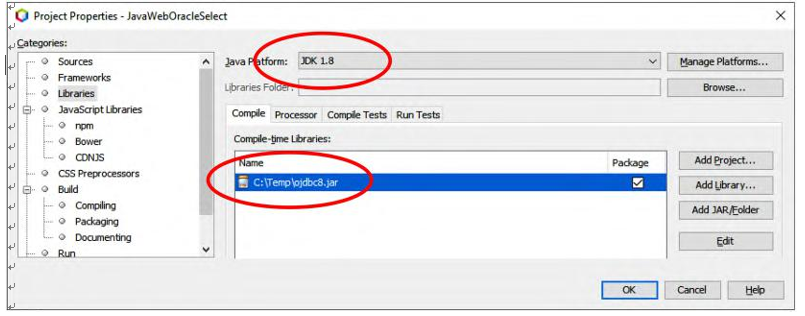
FIGURE 9.28 The finished Project Properties wizard.
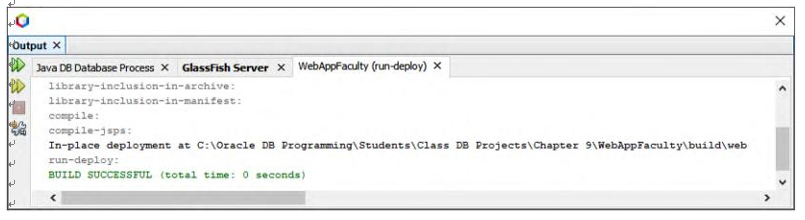
FIGURE 9.29 The deployment result of our Web service project.
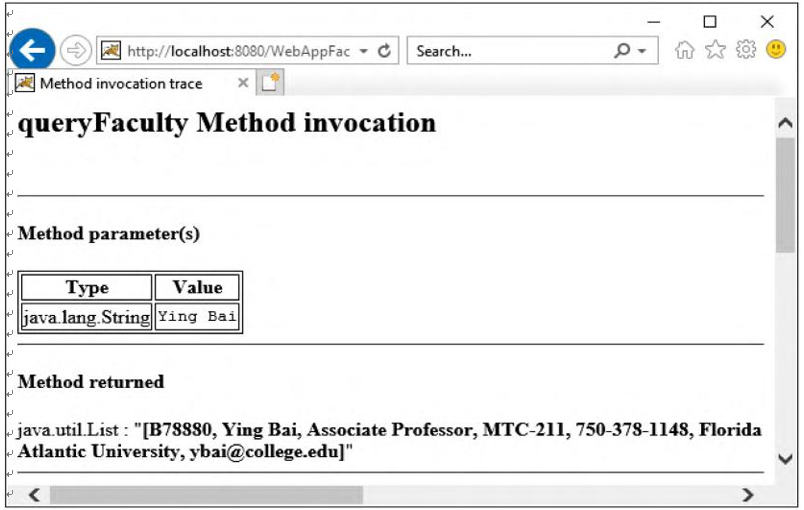
FIGURE 9.30 The test result of our Web service project.
It can be seen that all seven pieces of queried faculty information for the selected faculty member have been retrieved and displayed in the tester. Our data query for our Faculty Table is successful using our Web service.
Now let’s continue to test the second operation, QueryImage(), by clicking on the Back button to return to the original test page. Enter a desired faculty name such as Ying Bai in the text field and click on the queryImage button. The selected faculty image is [B@66c557e1.
Next we can develop a Windows or Web client project to consume this Web service to per-form a data query from the Faculty Table in our sample database. In fact, as we discussed in Section 9.3.5, we can develop different kinds of client projects to consume a Web service. In the fol-lowing sections, we will discuss two popular client projects, Window-based and Web-based clients, to consume our Web service to perform queries to our Faculty Table.

First let’s discuss how to build a Window-based client project to consume our Web service.